In Greasemonkey tutorial, I have covered how to write Greasemonkey user scripts. After this tutorial,you will be able to write user-scripts for Greasemonkey.
Topics covered:
GreaseMonkey Installation
Hello World Example
Adding a Button
Reading/Modifying HTML content
Loading External Scripts.
What is GreaseMonkey?
“Greasemonkey is a Mozilla Firefox extension that allows users to install scripts that make on-the-fly changes to web page content after or before the page is loaded in the browser”
Below picture explains how grease monkey works.

1. GreaseMonkey Installation
Download latest addon from : https://addons.mozilla.org/en-US/firefox/addon/greasemonkey/


Once the Greasemonkey is installed in Firefox, You can see Greasemonkey icon in the toolbar as shown in the below image.

2.Hello World Example
To write a new User script, Click on “New User Script” and fill all the details as shown in the below image.
After submitting the details, User-script is opened in an editor with initial configuration. Initial Configuration looks like.
// ==UserScript==
// @name        Hello World
// @namespace   http://hayageek.com
// @include     *
// @version     1
// ==/UserScript==
@name : name of the user script
@namespace : namespace to differentiate the scripts.You can use domain name as namespace
@version: version of the User script
@include: enable this script only for this URLs. add @include multiple times, for multiple domains.
Valid include values are.
//* is for all the websites
@include     *

//Script is included only for facebook.com
@include http://facebook.com/

//Script is included for entire domain
@include http://facebook.com/*
@include http://www.facebook.com/*

//Script is included for the domain and sub-domains
@include http://*.google.com/*

//All the http URLs
@include http://*

//All the https URLs
@include https://*
You can use all the Javascript API in Greasemonkey scripts. Below user-script shows an alert message when the webpage is loaded.
// ==UserScript==
// @name        Hello World
// @namespace   http://hayageek.com
// @include     *
// @version     1
// ==/UserScript==

alert("hello world");
Note: Make sure that “Enabled” and “Hello World” menu items are checked and You need to refresh the webpage or open a new page to see the effects.
2. Adding a Button to Webpage
We can create a button dynamically with JavaScript API and append it to current webpage body.
// ==UserScript==
// @name        Hello World
// @namespace   http://hayageek.com
// @include     *
// @version     1
// ==/UserScript==

var input=document.createElement("input");
input.type="button";
input.value="GreaseMonkey Button";
input.onclick = showAlert;
document.body.appendChild(input);

function showAlert()
{
    alert("Hello World");
}
The above script, adds a Button at the end of every webpage as shown in the below image.

By adding style to the button, we can show the button at the top as shown in the below image.
// ==UserScript==
// @name        Hello World
// @namespace   http://hayageek.com
// @include     *
// @version     1
// ==/UserScript==

var input=document.createElement("input");
input.type="button";
input.value="GreaseMonkey Button";
input.onclick = showAlert;
input.setAttribute("style", "font-size:18px;position:absolute;top:120px;right:40px;");
document.body.appendChild(input);

function showAlert()
{
    alert("Hello World");
}

3. Reading/Modifying HTML Content
HTML content can be read/write with HTML DOM object.In this section, I gave two examples.
3.1).Reading Youtube Video Information
Below code explains how to read YouTube Video information.
// ==UserScript==
// @name        Hello World
// @namespace   http://hayageek.com
// @include     http://*.youtube.*
// @include     https://*.youtube.*
// @version     1
// ==/UserScript==

if(window.location.href.indexOf("v=") > 0) //If it is a valid video
{
    var userName="";
    var title="";
    var userVideos="";
    var views="";
    if(document.getElementById("eow-title"))
        title = document.getElementById("eow-title").textContent;

    var as = document.getElementsByTagName("a");
    for(var i=0;i<as.length;i++)
    {
        var cls =as[i].getAttribute("class");
        if(cls)
        {
            GM_log(cls+"<br>");
            if(cls.indexOf("yt-user-name") >= 0)
            {
                userName = as[i].textContent;
            }
            else
            if(cls.indexOf("yt-user-videos") >= 0)
            {
                userVideos = as[i].textContent;
             }
        }

    }

    if(document.getElementById("watch7-views-info"))
    {
        var viewsObj = document.getElementById("watch7-views-info");

        var spans =viewsObj.getElementsByTagName("span");
        for(var i=0;i<spans.length;i++)
        {
                var cls =spans[i].getAttribute("class");
                if(cls.indexOf("watch-view-count") >= 0)
                {
                    views = spans[i].textContent;
                }
        }

    }
    var div=document.createElement("div");
    div.setAttribute("style",";border:1px solid red;padding:10px 10px 10px 100px;");
    div.innerHTML ="<h1>"+title+"</h1><br>";
    div.innerHTML +="<b>Uploaded By:</b>"+userName+"<br>";
    div.innerHTML +="<b>Uploaded Videos: </b>"+userVideos+"<br>";
    div.innerHTML +="<b>Total Views: </b>"+views+"<br>";
    document.body.insertBefore(div,document.body.firstChild);

    //hide sidebar
    var sidebar = document.getElementById("watch7-sidebar");
    if(sidebar)
    {
    	sidebar.style.display="none";
    }
}
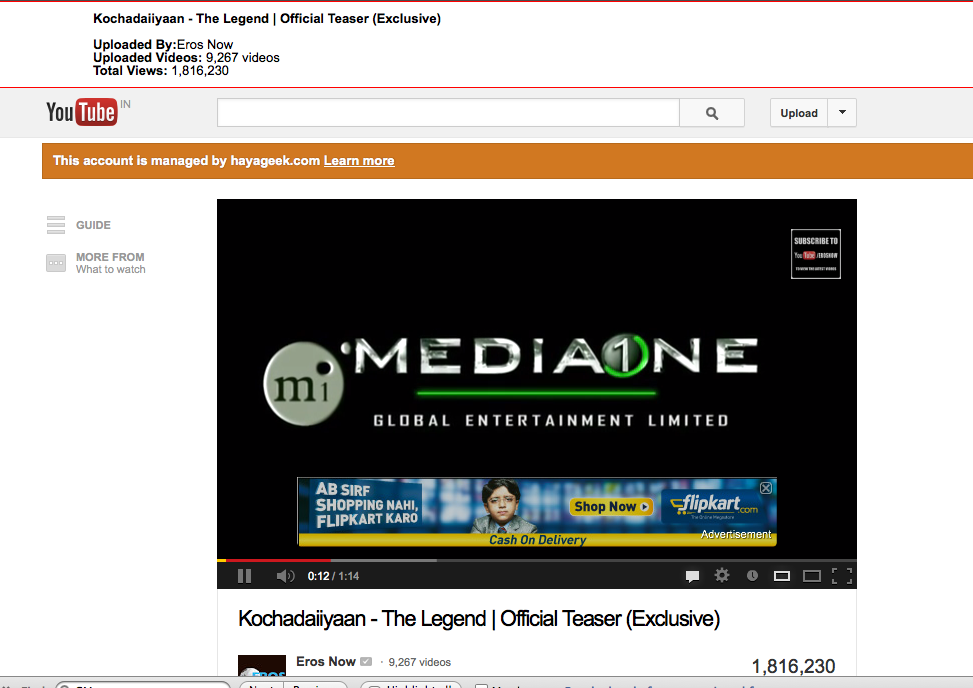
After adding the code to your script, open any YouTube video: Youtube. You can see the video information as shown in the below image.
3.2).Google Auto Search
The below script, fills Google.com search field with “hayageek.com” and submits.
// ==UserScript==
// @name        Hello World
// @namespace   http://hayageek.com
// @include     http://www.google.*
// @include     https://www.google.*
// @version     1
// ==/UserScript==

//Change the textbox value
if(window.location.href.indexOf("q=") < 0) //To avoid recursion
{
    var inputs = document.getElementsByTagName("input");
    for(var i=0;i<inputs.length;i++)
    {
        if(inputs[i].type == "text")
        {
            inputs[i].value = "hayageek.com";
        }
    }
    //Submit form
    document.forms[0].submit();
}
After adding the code to your script, Open Google
4.Loading External Scripts
External Scripts are loaded in Greasemonkey using @require tag. Below code loads jQuery and shows an alert when the document is ready.
// ==UserScript==
// @name        Hello World
// @namespace   http://hayageek.com
// @include     *
// @require     http://ajax.googleapis.com/ajax/libs/jquery/1.9.1/jquery.min.js
// @version     1
// ==/UserScript==

//Avoid conflicts
this.$ = this.jQuery = jQuery.noConflict(true);
$(document).ready(function()
{
    alert("jQuery is loaded");
});
To load multiple scripts,You can use @require multiple times.
// ==UserScript==
// @name        Hello World
// @namespace   http://hayageek.com
// @include     *
// @require     http://ajax.googleapis.com/ajax/libs/jquery/1.9.1/jquery.min.js
// @require     http://yui.yahooapis.com/3.12.0/build/yui/yui-min.js
// @version     1
// ==/UserScript==
If the script is already loaded in the webpage, then it can be accessed using unsafeWindow object.
// ==UserScript==
// @name        Hello World
// @namespace   http://hayageek.com
// @include     *
// @version     1
// ==/UserScript==
var $ = unsafeWindow.jQuery;
$(document).ready(function()
{

    alert("jQuery is working");

});